For this batch we decided to make a Belgian Pale Ale. While more advanced home brewers will construct their own recipes, we're still fairly new at this so we just went to the home brew store and picked up their starter kit. An important point to note about this is that we're doing "extract brewing" here as opposed to "all grain brewing", the difference being that we're using malt extract to get the sugar that the yeast needs.
Step 1: Getting Ready
If you ask any home brewer what the most important part of brewing in, they'll answer "sanitation." While the final product of this process is resistant to spoilage, they key to getting there consistently and safely is ensuring no biological baddies get to your beer before the yeast does.
As a result it is very important to thoroughly wash everything that will come in contact with the beer. We use two products called PBW (Powdered Brewery Wash) for removing organic deposits and Star San which is an odorless no-rinse sanitizer.

After everything has been cleaned, it's time to get down to the real work and make some beer. The first step, of course, is to make the concoction that the yeast eats and turns into delicious beer, the wort. This is a pretty simple process when you're doing extract brewing like we're doing here. You basically brew a tea by bringing a large batch of water to a rolling boil and adding the malt extract, hops, and other ingredients as specified by the recipe.

Step 3: Fermentation
Once you've completed your wort, it's time to make the magic happen. Here sanitation becomes a big issue again. You now have what is effectively a giant petri dish that'll grown any microorganism that is introduced. You want this to be your yeast.
The first part of this is cooling down the wort as quickly as possible. We did this in an ice bath while the wort was still in the aluminum pot to aid in heat transfer. This can be done much more quickly using a copper cooling coil with circulating water, but we didn't have one of those. Once the wort was at the temperature appropriate for the yeast we we syphoned it into the glass (not plastic) carboy where the yeast would be introduced and the fermentations would take place.

After the cooled wort had been transferred to the glass carboy we introduced the yeast. An important part of "pitching" the yeast is giving it enough air for it to start doing it's job. Knowing that we had messed this up in the past, we shook the capped carboy for a full 15 minutes, trading off when someone was getting tired. As usual, there are better tools for this (aerators like you use in a fish tank) but we didn't have one of those.
At this point, you've done all you can do, it's time to let the yeast do their magic. We let this particular batch sit about two weeks while the sugars in our wort got transformed into alcohol. Note that for better results, you'll measure the density of the wort and temperature before and after so you know how much of the sugar has been turned into alcohol. We didn't do this because we were lazy. However, we did decide to track the temperature of our wort to make sure our yeast wasn't being shocked since it had been a problem before.
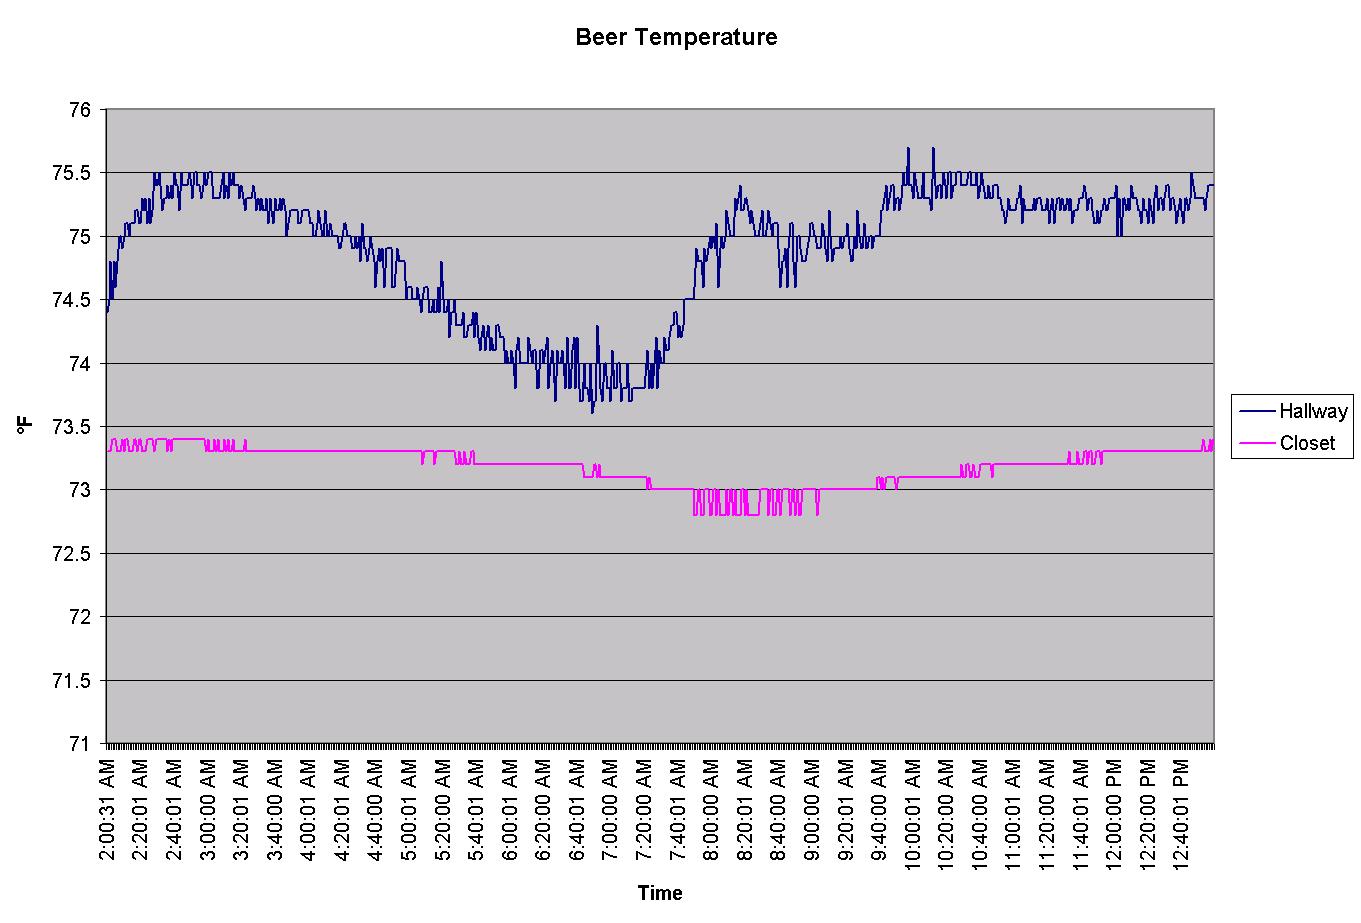
In the graph you can see how much steadier and cooler the closet stayed than the hallway on the other side of the door. A closet is a good place to ferment beer.
Step 4: Bottling and Drinking
After two weeks of fermentation it was finally time to bottle the beer. Many people put their beer in a keg and then force carbonate it. This reduces the TTD (time to drunk) and gives you more consistent carbonation. However, as is the trend, we didn't have that equipment so we did it the old fashioned way. We filled and capped 48 bottles and let the yeast ferment a little more in the bottle. This provided the CO2 needed for the carbonation after another week or so. The final result was delicious and definitely worth the wait!

Here's a link to the web album with all the pictures from the process.
Technologies: Yeast, Arduino, Fire


No comments:
Post a Comment